Sunday, April 29, 2018

A New Dress!

UPDATE: I was never pleased with the fit of this dress, so I took it apart and tweaked it in summer 2019. 

I removed the green piping and replaced it with a bias tape facing. I scooped the armholes in a little to make them more comfy (esp nice for layering). I also scooped the neckline out to give it a rounder shape. And I took in the side seams a bit!


So much happier with it! I love it now!


Original post follows:

I've had this linen/cotton blend in my stash for a while and a few weeks ago I finished this dress out of it. 


I made it bit by bit over the past few weeks, an hour here and there. I used the same pattern from my green lace dress, with a few fit mods. 

The armholes came out a little small, which makes sense, because this pattern is for a dress with sleeves, I just left the sleeves off. Probably should've adjusted that. Oops. Next time!


Not entirely pleased with the back fit, it should be smoother. But I didn't want the dress too tight so it's acceptable.


I added pockets.


The neckline and armholes are finished with a piped binding.


I used two sizes of grey mother of pearl button, because that's what I had in the stash!


I mostly planned this for layering so when I was actually wearing it I thew on a bright cardigan.


If I was making this again:

More fitting tweaks, esp above bust and in back.
Cut the armholes in a bit in front.

Otherwise, I'm happy with it! It's cute and comfy and layers well. I think more jumper dresses are in my future.

Thursday, April 19, 2018

Me Made May: Style Thoughts

I know, it's not May yet, but I am getting prepared!

I've never taken the time to sit down and think about my style. I tend to make (or buy) clothes one piece at a time, without considering the whole look and wardrobe. That means I end up with a lot of great pieces, but often nothing goes together, and I don't always find that what I make suits me. Today I'm analyzing what I'm drawn to style-wise.

For everyday clothes, I have a few serious requirements and deal-breakers.

Practicality - Warm winter garments, cool summer garments, and everything easy to wear and move around in. I need to be able to walk, run, sit on the ground, ride a bike, cook, work, and lift heavy things. Fitted cuffs so I can use my hands, and not too many things dangling off of me.

Fit - I like having a waist. With a full bust and pear-shaped hips, I would easily drown in my clothes if the waist wasn't defined. Good bust and shoulder fit is nice, but less crucial.

Colors - I don't have a single capsule palette, but there are colors I like and ones I despise.

Pants - It's not pants.

I need to be honest and admit my style sense shifts and changes constantly. The above parameters pretty much stay the same, but the mood is always changing. Sometimes I prefer bright colors and big, bold prints! Other times I spend a year wearing all black.

Right now I feel like I am reverting to the style sense I had in my teens and early 20s. I am moving away from simple brights and clean lines and back to layers, a longer silhouette, and more texture.

My current idealized style is captured by most of the stuff on my pinterest board. (My real, everyday style is based a lot more in practicality and what I can find!) I can sum up that idealized style in a few genres:

Cute Librarian

Try some blouses  The Robot That Had a Heart: cardigan over a printed blouse tucked into a line skirt with tights and boots  x 

Folk Style

Anatolia pullover sweater from Rowan Magazine, issue 54  CocoVero HW 15 bei LIMBERRY Lena HoschekRock „Almrausch“  In Love with the skirt and blouse. By Julia Trentini Dirndl FS 2017

Mori Girl, especially the darker Mori looks

Dark Mori & Strega Fashion  Mori girl
rundholz dip - Kleid mit Tüll Paint mohn - Sommer 2015 - stilecht - mode für frauen mit format... 

Vintage and historic-inspired: prairie style and 1910s through 1950s

Outfit // Edwardian Serendipity, vintage style, 1910s style, modest vintage fashion, modest winter fashion, feminine, edwardian, Miss L Fire Millicent Boots Very simple grey linen dress MM50 by xiaolizi on Etsy, $58.99
  Prairie Skirt

What do these all have in common?

Skirts - all the time, mostly full and longer

Layers - cardigans, petticoats, several dresses together, aprons, scarves

Modesty - I don't have a modesty agenda, it's just the most cute and practical to me

Small prints and patterns - florals, plaid, stripes; mostly calm, occasionally LOUD!

Feminine - ruffles, ribbons, and delicate touches

Potential Problems

Hair - I always wear my hair pinned up, but I find that some looks just feel wrong without a mane of hair rippling all over the place. Hair done up combined with more modest elements (like a high neckline or long sleeves) can read as frumpy.

Accessories - I don't wear a ton of jewelry, mostly just earrings, because they don't get in my way. If an outfit really needs a necklace and bracelets to complete the look, it's probably not for me.

Fit - With all those layers, the waist can often be lost.

Warm Weather - I feel so much more at home in my winter clothes. The length and layers really suit me. It's a challenge to make my style ideas work for spring/summer.

Colors

My YES! colors include dark turquoise, moss and olive greens, and slate blue. Warm touches include fuchsia, plummy purples, pumpkin orange, saffron or dark golden yellow, and cinnamon red or brick red.

Looking at them all together seems like a lot of brights, but I tend to mix them up and spread them out with the calmer colors and neutrals. Plus a darker or less saturated tone of any of these colors is also a yes for me.

For neutrals, I almost always prefer cool tones. Greys, charcoal, and the occasional unbleached linen. Sometimes off-white. Also note the huge black chunk at the bottom!
My Colors!

My NO WAY colors are pretty much any pastel, peachy colors, and light teal. Neons are a no for me. Most "royal" or jewel tones and most reds are hard for me also.

Warm neutrals are not generally for me. I can do some browns, but I am not fond of rich chocolate brown or most beige-y tones, or any warm neutral that can't be friends with a black shoe.
Ew, no thanks.
The Next Steps

I am not sure if what I am drawn to in the abstract is what I really like on me. What I pin on Pinterest isn't necessarily what I sew, and what I sew isn't always what I end up wearing! I get dazzled by lovely fabric prints, but often find I don't wear the things I make from them. I pin a lot of plainer things, but don't usually sew them.

Bringing those elements into alignment - what I drool over, what I sew, and what I wear - would make my sewing more productive.

That's why my Me Made May goals include:
  • Daily outfit photos
  • Styling separates differently
  • Trying new style elements

I'm excited to get started!

Wednesday, April 18, 2018

Me Made May 2018

This year, I am participating in Me Made May!


I plan to include a mix of modern and historical sewing in this challenge, since that's what's on my agenda right now. Of course, the wardrobe/style goals relate more to modern sewing, whereas the "sew every day" goals are for either!

My Me Made May 2018 Goals:

Wear:
  • Every day, wear at least one thing I have made, whether old or new. As many days as possible, wear 2+ me-made things.
  • Wear every me-made garment I have at least once (provided it is seasonally/modern/everyday appropriate).
  • When wearing repeat separates, mix up the combinations.
Make:
  • Sew or knit every day. On work days, an hour is enough. On days off, my goal is 3+ hours.
  • Finish at least 3 modern garments and 2 historical garments.
  • Try one new sewing technique.
Style:
  • Use my pinterest board to think about the styles I'm drawn to.
  • Try a few new style elements (especially the ones that feel scary!) and decide which ones I want to keep. I'm okay with styling me-mades together with boughten elements.
  • Think seasonally! Minnesota is a land of extreme variations.
Share:
  • Take daily outfit pictures, because I want to think about what I am wearing and whether it fits my style goals.
  • Blog post weekly to keep up with my progress.

You can find the info for Me Made May right here!

Friday, April 13, 2018

Trimming an 1860s Bonnet

A while ago an internet friend asked if anyone would be willing to trim a bonnet for her. I eagerly volunteered for this project! Making hats and bonnets from scratch is fiddly, but just putting the trims on is the fun part!

Katie sent me a delightful box of goodies. A pre-made, silk-covered blank bonnet from Timely Tresses was the base.


Loads of lovely flowers and ribbons from Etsy!


I consulted several fashion plates for design inspiration, including these. Katie asked me to just be creative with the design, and also said that more is more!


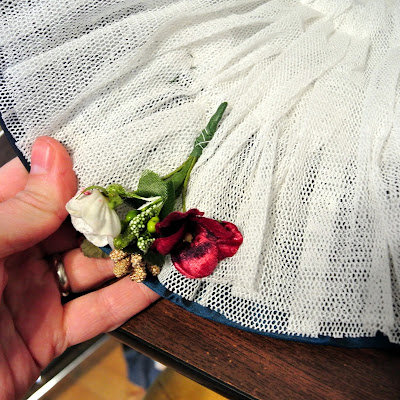
I started with a double layer of gathered cotton net. This was easily the most challenging part. It's very hard to do any sewing on the tight inner curves inside the bonnet.


I tacked the net at the far back, the edge of the brim, and at the midway point.


Flowers were next! I had several bunches of flowers, velvet leaves, glass berries, and golden and green sprigs to work with. I started with the ones for the inside of the brim. I gathered a few flowers and things into tiny bunches like so:


Then I wrapped their wire ends together and covered them with floral tape. If you've never used floral tape, you should know it's amazing. It has a papery texture, it stretches, and it only sticks to itself. Perfect for covering up all the wire and locking everything in place.


Several of the finished sprigs, before taping.


I sewed them down with white thread at the edge of the inside brim.


As I went along, I pulled the net over the stems and tacked it down to hide the stem ends.


I played with the layout a lot before committing. A lot of 1860s bonnets have just a few flowers, or one central bunch, or a bunch off to one side. Katie told me more is more, so I just went ahead and filled the whole inside brim!


Then I started the bunch for the top. First I made a flat base of velvet leaves. Then I made some larger sprigs of flowers. I thought keeping the glass berries together would have the best effect.


I started sewing them to the leaf base, crossing their stems.


All sewn down!


Finally, I bent the stems back up to cover all the sewing. The finished piece!


I cut several loops of ribbon to pleat and lay under the flower piece.


To trim the outside, first I sewed two pieces of ribbon over the crown, pleated the long way to give them texture and help them shape over the curve. Then I added the loops and the floral piece right on top.


The last step was to add the chin ties. I used two lengths of ribbon, cut the ends at angles, and sewed tiny hems. Then I pleated up the other end into a little fat stack of pleats so it was only about 1/2" wide, and sewed it to the pointy tip of the bonnet brim. 


The ties are about a yard long to make a nice full bow.


Here's Katie wearing this bonnet at an event in Gettysburg! I love the way it coordinates with her dress!


This was a super fun project. Trimming hats is definitely my cup of tea!