Showing posts with label Tutorial. Show all posts

Sunday, August 29, 2021

My comfiest masks

I never thought I would be so picky about my masks, but here we are. With the Delta variant it seems like masking is still a helpful measure and I want to do my part, but stay comfy, too! So here are the iterations my pattern has undergone in my comfy quest. 

I started out making masks with a basic pleated rectangle pattern. It worked, but it was not so great.


I soon after tried the seamed-front pattern from Craft Passion - download it for free here!


I liked this shaped style much better! Plus the little channel on the sides to cinch it up, and the strips of knit fabric for head ties vs. twill tape or elastic - all huge improvements.


Here's the Craft Passion pattern, along with my traced versions with added seam and hem allowances. Again, you can download her free pattern here.


Okay, onto some CHANGES!

With all-day wear, I found the masks pushed uncomfortably into my nose, so I added just to the front of the pattern, particularly at the top.


That really helped! The extra room kept the mask from smashing my nose. 


Here's the original next my my updated version. (The tiny handwritten notes say I added a little extra length, but I ended up taking that off as it cut in a bit under my chin. See pattern comparison above.)


But  even though it was roomier, I still found that the center seam annoyed my nose after a few hours. So I drafted this version with a bias-cut center gusset.


Again, very comfy, and no chafing seam! But it's possible this one is a little too loose; I did find if I breathed quickly I inhaled the loose mask fabric a little. More tweaking is needed.


COMFY NOTES:
  • Pre-wash your fabrics! A mask that fits now might shrink and feel tight after washing.
  • Use T-shirt or knit fabric ties. I cut 1" strips and pulled them to make them curl. I prefer head ties but this works for ear loops too. I left extra length to untie and adjust as needed.
  • Line your mask with something smooth; anything linty can really irritate the nose. I used cotton sateen for my last few.
  • Make your side channel small; the tie should fit snugly. That way you can adjust the straps and the mask will stay where you put it.
  • Trim the heck out of your seam allowances. Grade, layer, and nest (press in opposite directions). Anything to reduce bulk.
I hope this helps you stay comfortable and masked! 

Monday, March 16, 2020

Free Pattern: Garter Wrap Hat

Finding a warm, practical hat that accommodates my hair is tough. Loose, baggy hats don't keep the cold out, and ear-warmers are often just too small. I wanted a hat that gave maximum ear and head coverage while still allowing plenty of space for my hair.

This is the second iteration of this hat; I liked the first one okay, but I didn't write it down, and then after a few years the hat went missing! (Don't worry - I found it as soon as I had knitted this one!) This time I worked more systematically and wrote down everything I did along the way.


Garter Wrap Hat

This hat is simply shaped at each end and has short rows worked over the top to enable it to curve over the head.

Gauge is not crucial as you will be measuring as you go. A tight, dense gauge will make a warmer hat.

I just barely squeezed two of these hats out of one skein of Cascade 220. You may need anywhere from half to a whole skein.

Size: 18" long by 6.5" wide, to fit a 22" head snugly
Yarn: Cascade 220 worsted weight wool (1 skein or less)
Needles: US 5 (or size to obtain gauge)
Gauge: 21.5 sts = 4" in garter stitch
Notions: two large safety-pin style stitch markers, row counter (optional but helpful), one 3/4" button, needle & thread


abbreviations

CO - cast on
BO - bind off
kfb - knit into the front and back of each stitch (to increase one stitch)
YO - yarn over needle
k2tog - knit two stitches together (to decrease one stitch)
ssk - slip, slip, knit (to decrease one stitch)
W&T - wrap and turn. Bring yarn forward between needles, slip next stitch, bring yarn to back, slip stitch back to left needle, turn work around to knit the other direction.

Directions

CO 5 stitches
Knit 1 row
K1, kfb, K1, kfb, K1 (7 sts)
Knit 1 row
Buttonhole row: K1, kfb, K1, YO, k2tog, kfb, K1 (9 sts)
Knit 4 rows
Place a safety pin style stitch marker on the side of the work facing you. (This hat has no right or wrong side, but the stitch marker on one side will help you keep track of rows.)

Next row: *K1, kfb, Knit to last 2 sts, kfb, K1
Knit 2 rows *

Repeat rows between * until you have 35 sts on your needle, ending with the Knit 2 rows. (If you would like the hat wider, continue to repeat the last 3 rows as desired.)

Place a stitch marker on the first stitch on the needle.

First short row: Knit to last 5 sts, W&T
Next short row: Knit to last 5 sts, W&T
* Knit 6 rows
Repeat two short rows *

Repeat rows between * until hat measures 13" from CO. Using your row counter can help you keep track of rows in this section.

This is a good time to check the fit. Wrap the hat around your head with the buttonhole at the back of your head, just under your hairline. Stretch the hat to a snug, comfortable fit, covering the forehead. Look in the mirror. The second marker you placed should fall symmetrically in the same place on your face as the live stitches on the needle. (For example, if the marker is at your eyebrow, the needle with live stitches should be at the level of your other eyebrow.) If you would like more length, continue repeating the rows between * until you have your desired length.


Begin decrease shaping: * Knit 2 rows
K1, ssk, Knit to last 3 sts, k2tog, K1*

Repeat between * until you have 9 sts

Knit 4 rows
K1, ssk, Knit to last 3 sts, k2tog, K1*
Knit 1 row
K1, ssk, K1, k2tog, K1*
BO last 5 sts

Sew a button to the BO end.

If you make this, please let me know!

Wednesday, September 20, 2017

How To Make a Star Trek Communicator Badge

For my daughter's Deanna Troi costume from Star Trek: The Next Generation, I made this communicator badge.


I had thought about buying a nice fancy com badge, but I was feeling thrifty so I decided to pull this together from scraps I had on hand. I like the way it turned out a lot! It's 3-dimensional, which makes it much more realistic than embroidered or appliqued ones, and since it was so cheap and easy to make it's perfect for kids and/or more casual costuming.

What you'll need to make this:
  • 3" x 6" piece of fusible Peltex interfacing
  • 4" x 4" piece of Wonder-Under fusible web
  • 4" x 4" piece of yellow cotton fabric
  • 4" x 4" piece of silver lame fabric
  • 2" x 3" piece of felt
  • Metallic gold fabric paint
  • Pin back
  • Hot glue gun or fabric glue
  • Thread and needle
  • Basic sewing supplies
  • Printout of your com badge

For the silver part, I used a metallic lame fabric, and for the gold, I used metallic paint on plain cotton. You could definitely use metallic paints for both fabrics, or try to find metallic fabrics for both parts instead of doing any painting. This is just what I had on hand.

There are tons of different com badge styles for the various series. A Google search brought up loads of charts and images. The one I chose is from an eBay product listing of a repro com badge for sale.

What To Do:

Trace your com badge components and cut out of the fusible Peltex. Make sure you cut this with the fusible side facing UP. I did this wrong the first time and ended up with a mirror image shape. 

Also, don't be afraid to spend time making tiny adjustments to the shape. Details matter, and you want the right shape and perfectly smooth edges here, because you can't fix it later.


Fuse the Peltex shape to your silver lame: put the Peltex piece on the ironing board, fusible side facing up. Lay the lame over the top. Cover it with a pressing cloth. With your iron set to a medium heat and steam, press firmly for about 10 seconds. Don't move it until it is cool.

Trim the excess lame around the shape to about 3/8". (Please note this photo is of the one I traced backward. Oops!)


Fold to the wrong side and sew in place, using long stitches to connect the opposite sides like a ladder. Fiddle with the corners to make them nice and pointy and then stitch them firmly.


It's probably possible to use glue for this step, but I don't recommend it. Glue is messy, slow, and much more difficult to make smooth. I know this because I tried it on my first (backward) attempt! Sewing it is quick and simple and you don't have to care much what the stitches look like because they will be covered up later!

When you're done it should look like this.


Set aside and move onto the gold part! 

Apply the Wonder-Under to your yellow cotton fabric. Leave the paper backing on. 

If you've never used Wonder-Under before, its job is to make any fabric into an iron-on fabric. First you fuse the Wonder-Under to the fabric, then you fuse the fabric to whatever you want! I happened to have a yellow scrap with Wonder-Under already fused on to it, or I might not have bothered, since the Peltex is already fusible, but it did make some of the next steps easier.

On the other side, paint a few coats of gold metallic paint. Wait for it to dry. (If you're using gold fabric, skip this step.)


Peel off paper backing. Place your Peltex shape on the ironing board, fusible side up, and put your painted fabric on top, fusible side down. (Fusible sides of each should be touching.) Cover with a press cloth. 

Press lightly, just in the center, using the tip of the iron only. You don't want to fuse the whole piece of fabric to your ironing board! Just the middle of the oval shape.

Trim the edges and notch the fabric. This makes them turn in more smoothly. Be careful not to notch too close to the Peltex or you'll have a cut in your finished edge.


Fold all the edges over and press to fuse them down. I did this by placing my press cloth on the ironing board, then putting my oval piece on it and gathering the cloth up around the oval shape. The press cloth pulls the edges in and keeps them neat while you iron over the whole thing.


All done!


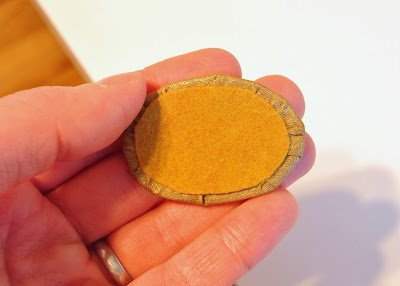
Warm up your hot glue gun, or get out some fabric glue. Cut an oval of coordinating-color felt a little bit smaller than your gold oval. Glue in place.


Glue your two pieces together.


Find a pin back. I got this one at a craft store but I actually ended up ripping it off later and using a safety pin instead, because this pin back had a very thick pin! I could not pin it to the costume without damaging the fabric. So check your pin first.


Glue in place. You can see that I am super messy at hot glue. But that's okay, because it's the back, and no one's gonna see it!


The finished communicator.


It was a perfect accessory for her costume!