Showing posts with label 1860s. Show all posts

Friday, April 13, 2018

Trimming an 1860s Bonnet

A while ago an internet friend asked if anyone would be willing to trim a bonnet for her. I eagerly volunteered for this project! Making hats and bonnets from scratch is fiddly, but just putting the trims on is the fun part!

Katie sent me a delightful box of goodies. A pre-made, silk-covered blank bonnet from Timely Tresses was the base.


Loads of lovely flowers and ribbons from Etsy!


I consulted several fashion plates for design inspiration, including these. Katie asked me to just be creative with the design, and also said that more is more!


I started with a double layer of gathered cotton net. This was easily the most challenging part. It's very hard to do any sewing on the tight inner curves inside the bonnet.


I tacked the net at the far back, the edge of the brim, and at the midway point.


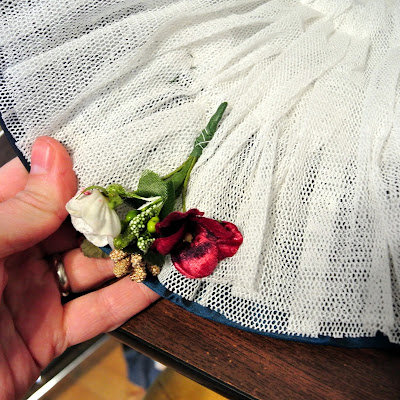
Flowers were next! I had several bunches of flowers, velvet leaves, glass berries, and golden and green sprigs to work with. I started with the ones for the inside of the brim. I gathered a few flowers and things into tiny bunches like so:


Then I wrapped their wire ends together and covered them with floral tape. If you've never used floral tape, you should know it's amazing. It has a papery texture, it stretches, and it only sticks to itself. Perfect for covering up all the wire and locking everything in place.


Several of the finished sprigs, before taping.


I sewed them down with white thread at the edge of the inside brim.


As I went along, I pulled the net over the stems and tacked it down to hide the stem ends.


I played with the layout a lot before committing. A lot of 1860s bonnets have just a few flowers, or one central bunch, or a bunch off to one side. Katie told me more is more, so I just went ahead and filled the whole inside brim!


Then I started the bunch for the top. First I made a flat base of velvet leaves. Then I made some larger sprigs of flowers. I thought keeping the glass berries together would have the best effect.


I started sewing them to the leaf base, crossing their stems.


All sewn down!


Finally, I bent the stems back up to cover all the sewing. The finished piece!


I cut several loops of ribbon to pleat and lay under the flower piece.


To trim the outside, first I sewed two pieces of ribbon over the crown, pleated the long way to give them texture and help them shape over the curve. Then I added the loops and the floral piece right on top.


The last step was to add the chin ties. I used two lengths of ribbon, cut the ends at angles, and sewed tiny hems. Then I pleated up the other end into a little fat stack of pleats so it was only about 1/2" wide, and sewed it to the pointy tip of the bonnet brim. 


The ties are about a yard long to make a nice full bow.


Here's Katie wearing this bonnet at an event in Gettysburg! I love the way it coordinates with her dress!


This was a super fun project. Trimming hats is definitely my cup of tea!

Monday, April 25, 2016

A Cage Crinoline for the early 1860s

Back in February my sister and I made a plan to attend the annual LHS Winter Ball. I was able to outfit her in an 1860s ballgown, but that left me with nothing to wear! I needed not only a gown, but a set of undies as well.

I was never perfectly happy with my pink toile hoopskirt from back in 2008. I made it from Simplicty 7216, and the shape always seemed a little weird to me. Before I made another hoopskirt, I looked at some period images to get a better idea of what kind of shape I was looking for.

Costumers often refer to hoops in two basic categories: round and elliptical. Round hoopskirts have the fullness all around, with a round bottom hoop. Elliptical ones have more fullness thrown toward the back, with a slightly oval bottom hoop. However, historic examples show more variation. You can follow a basic timeline of hoop changes, but keep in mind that photographs show a more complex story. There were many different hoop manufacturers making many different shapes, so while you can create a sweeping arc of general trends, there will always be room for odd differences.

Note: In the period, the terms hoopskirt, hoop petticoat, crinoline, and cage crinoline all described support undergarments with hoops of steel or other stiffener. For this blog post, I am just going to refer to any of these garments as a "hoopskirt."

Hoops in the 1850s evolved from the dome shape of the 1840s. This shape was very full and round over the hips, with a line that hung straight down to the floor as it reached the hem.

Dome shaped skirt 1858:
dress 1858

While the shape is a dome, examples also exist with more fullness toward the back.

Balmoral hoop skirt:
Balmoral hoop skirt 1858

By the 1860s, the shape had become slightly more triangular, with less fullness over the hips, a larger hem circumference, and more angled sides. The dome shape is starting to dwindle.

Hoopskirt 1864:
Hoopskirt 1864

c. 1860:
Hoopskirt 1860

After 1864, the "elliptical" shape emerges: even flatter over the hips, almost straight in front with lots of fullness in back, and a strong triangular line. The dome effect is almost gone, and the bottom circumference is very large.

Very elliptical skirt dec 1864:
Elliptical silhouette

In 1867-8, there was a brief fad for a very small, triangular hoopskirt paired with a slightly raised waist. The look was very narrow, with a straight, angular line and very little fullness over the hips.

triangular hoops 1867-8:
Narrow triangular hoop silhouette 1867-8

After I spent some time looking at examples, I felt that the most flattering shape for me was more domed than triangular, but since my event was set in the 1860s, I tried to compromise with something rounded, but still flatter than that super-full 1850s dome. I was aiming for a moderate hem circumference of about a 112.

I started out with my old hoopskirt and a measuring tape. I measured the bottom hoop and the length from my waist to the floor while wearing it. Then I set the old hoop aside and started playing with numbers. I used the tape measure around my body for some rough estimates and did a little math to make things even.

I cut 16 lengths of twill tape, doubled them so I had 8 pairs, and marked them for sewing the hoop channels. I sewed the channels on the machine about every 6 inches to make space for 7 hoops.


I cut the hoops roughly to size and inserted them in the twill tape casings. I knew I would have to trim some off later, but I wasn't worried about wasting hoop wire (much) because 6 out of the 7 hoops came from old projects I took apart and salvaged.


Then came the fun part! I put it on the dress form and started playing with it! At first it looked pretty crazy:


Then it started looking a little better, sort of:


And eventually started shaping up into a hoopskirt! I added a waistband somewhere in there and trimmed off some of the excess twill tape.


I took it off the form to attach the ends of the hoops together.


First I tipped the bone ends with rubber tips, then overlapped and sewed them together with strong craft thread.


The finished hoopskirt!


I made a new petticoat with a large flounce to go over this hoop. It's amazing to see the difference in the shape with a petticoat over it! I love the side silhouette. There's none of that weird bump my old hoop had, and the size is just right for me: not too big, not too small.


I am very pleased with it. It was light and easy to dance in. I was a little worried about putting a foot through it but that didn't happen. I might still go back and add a fabric hem to prevent this in the future.

To be completely ready for the ball, I also needed a dress, of course! That will be a separate post. Until next time!