My sister Angela was married in July of 2016, and (as per our long-standing agreement) I sewed her wedding dress.
All the wedding day photos are from
Golden Hour Photography. They did an amazing job and were very nice people to work with. I definitely recommend them!
I made my own wedding dress back in 2006, and I made one for a friend a few years later, but both were in a Victorian style, and not much different from what I would consider historic costume. So this was my first actual modern wedding dress.
A wedding dress is a Big Deal. Even if you don't buy into the Cult of Weddings, even if you are keeping it low-key and casual, even if you truly don't care about having a
perfect day, the wedding dress will still always be a high-pressure zone.
Her vision for her dress was, in her words, "Plain, Plain, Plain, and Simple." Short skirt, no lace, no beads, no veil, and definitely NO frippery. The first image she sent me was
this one from Pinterest:
Hm.
It's a cute dress, but didn't scream "bridal." We talked a lot about her options, and eventually settled on a dress design that was still simple, but had a few more details.

The final design featured cap sleeves, a scoop neckline, princess seaming, and skirt godets. We added a veil and sash also, and purchased a floofy petticoat at the last minute (thank you, Amazon Prime 2-day shipping!) to enhance the silhouette.
The finished look was simple, flattering, beautiful, and very "her."
The pattern I used was
New Look 6299. It had the princess seams, cap sleeves, and godets we wanted, but I had to reshape the neckline. During the planning and mockup phase, we were cautious about how low/revealing the neckline would be, so it took many tries and revisions to get it to the "just right" depth while still making the shape flattering. Also when you start cutting up a neckline, there is a lot of potential for gaping. The neckline was probably the most challenging part of the fitting. The dress is fully lined, and I didn't use interfacing anywhere but I did stay-stitch the neckline very carefully!

One thing I realized during this process is how deceptively difficult a "simple" dress can be. At first I was like, "a knee-length dress in plain white satin? How hard can that be?" But it's like simple cooking: every ingredient and every process have to be perfect, and you can tell the difference. With a knee-length hem, each stitch had to be perfect. A slightly wobbly hem would go unnoticed on a floor-length dress, but not here! And without any lace or beadwork, I couldn't cover any of my errors. In that smooth plain satin, the fit has to be perfect or it's really gonna show.
I will never underestimate a plain simple dress again. And I will never sew with polyester satin again if I can possibly help it. The fabric she chose is pretty. And it's the
nice polyester; a creamy, thick duchesse satin. But it's still synthetic, and the seams look a little puffy since it's impossible to press well. I wish I could have talked her into a silk, but she just liked this one best.
The veil:
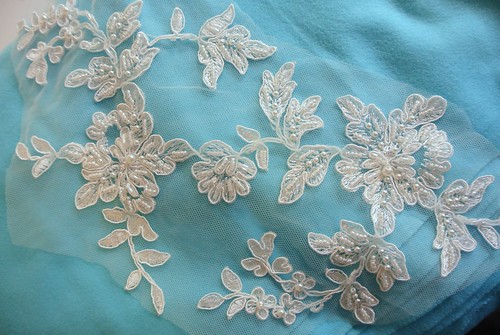
To make this I first made the lace assembly. I had 1/8 yd of beaded lace that I snipped apart around the motifs. I used Fray-Check anywhere I had to snip across a thread.
I took three of my lace pieces and arranged them on a piece of buckram, then stitched them down (reattaching any loose beads as I went). Then I cut, shaped, and gathered the tulle and machined it to a piece of Peltex interfacing. I laid my lace piece over the tulle and hand stitched it down, then cut away any excess interfacing.
Finally I added the clips.
If I were doing this again, I might skip the buckram step. I'm glad I did it because it gave me more time to play with the lace design before making it permanent, but the finished product doesn't really need it. And I might cover the underside with white felt before adding the clips, just to hide the stitches and make it prettier.
Here you can see the lace piece in action!
Here is the coordinating belt/sash thing. It is made from a wide piece of ivory-color ribbon with a lace piece like the veil's, but a little larger. It doesn't show up in many of the posed pictures because the bouquet is always hiding it.
In the back of the sash is a stitched, tailored bow with long tails. The sash actually fastens with hooks and eyes just under the lace piece.
One other challenge with this project was the distance; she lives in Seattle and I am in MN. We ended up coordinating all the dress stuff with visits. During her christmas visit, we chose a pattern and fabric, then she came for our birthdays at the end of February to try the mock-up. She visited again in May for a fitting of the actual dress. Then she flew in a few days before the wedding (which was here in MN, for various reasons) for the last (just-in-case) fitting of the finished dress. Other than that, we coordinated a lot through email and Pinterest!
As a sewist, there will always be things I will nitpick over, but I think we were both happy at how her dress came out. She was such a beautiful bride! I have never been happier for her, and I am so glad to have such a great new brother-in-law.
I made my daughter's flower girl dress from white cotton eyelet, lined in white cotton lawn, with a green ribbon belt and pink flowers. Here my daughter F is carrying a basket of small bouquets to hand to the mothers of the couple. She has her own bouquet also.
The crown is made of artificial flowers. I matched our real flower colors and taped the crown together with floral tape.
I loved seeing my little girl perform her role as flower girl so well!
I also made myself a bridesmaid dress in bright pink cotton stretch sateen, from the same pattern, but without the godets for a less full skirt. I also made my sleeves slightly longer.
My sister and I made the bouquets, and all the men's boutonnieres. We were pretty pleased with ourselves!
I was so honored to be a part of my sister's special day! Wedding dresses really are a labor of love and (despite all the technical challenges!) I was so glad to be able to make this dress.