Friday, August 5, 2022

The latest installment in my quest for the perfect blouse

I admit, I'm picky. For me the perfect blouse is fitted, with a nice curvy shape that skims my hourglass/pear figure, and definitely avoids the poufy back issue. Sleeves must have a comfy fit with a full range of motion, and the blouse should look good on its own or layered with jumper dresses and cardigans.

I'm less specific about the details. Sleeves from short to 3/4" to full, necklines from V to round, and collars of any kind or none. 

My latest version in this quest is made from an amazing Indian cotton. Ochre-yellow with hand-screenprinted birds and foliage.


I used all my favorite sewing techniques; French seams are everywhere I could put them and I hand-finished the inner cuffs, collar, and front bands.

The pattern is Butterick 6816. I blended sizes between the bust, waist, and hip and made a full bust adjustment to make this blouse fit me just right! 


I am 95% pleased with the fit; there are still some drag lines I'd like to eliminate, but overall it's looking pretty good. And I love the cute sleeve vent detail.


The slight color difference is from my phone vs. my real camera; in reality the color is more toward the citron/greeny tone.

I have already cut out another one of these and can't wait to sew it up!

Wednesday, March 16, 2022

It's a Dolly Wedding!

We had a dolly wedding! Two of the dolls in our house got married last fall. This was a very serious affair with new dresses and cake and the whole deal. All the household stuffies were in attendance and a grand time was had by all.


I sewed new dresses to each bride's specifications. Lots of color, lace, and detail!


I dressed up, too!


And I suppose a top hat counts as dressing up. FYI he's also wearing pajamas.


A wildflower bouquet for the bride.


The guests are assembled!


The wedding was officiated by little red riding hood on the end.


We did not have quite enough seating for everyone!
 

The happy new couple! They don't have fingers for rings so they got wedding bracelets.


Making doll clothes is so fun and I always love the end result!

Thursday, January 27, 2022

A pleated corduroy skirt

I made a new skirt! I got this floral printed corduroy at the Textile Center garage sale a couple years ago and the pattern reminds me of an 18th century chintz, so I thought a full pleated skirt would be a fun historically-inspired project.

I really love how it turned out! So floofy and full, so cozy and warm! I have been wearing it with a petticoat; I like the extra floof and it also prevents the skirt sticking to my leggings.


The waist is adjustable and here's why. The first winter after Covid, I found to my dismay that none of my winter skirts fit anymore; I got a couple inches bigger around the middle. Now, I am happy with my body and I feel good, but the damn zippers just wouldn't zip! So I started this skirt with the plan to make the sizing flexible.

For awhile I overthought the adjustable aspect but decided to keep it simple; I pleated the skirt into a band about 2" larger than my desired finished measurement, then just overlapped the band and sewed several sets of hooks and eyes.


The pleats, the busy fabric, and the fullness all hide the overlap quite nicely!


I don't usually choose brown for clothes, so I've been a little lost about what to pair this with. So far this thrifted red tee is my favorite, but I've also liked it with green!


Ok the last thing I want to say: I plead with anyone reading this, please don't over-complicate pleated skirts! You DON'T need graphs, you DON'T need math, and you definitely don't need to precisely measure your pleats!

This is a big giant rectangle, and I just hand-formed each pleat and used some trial and error to perfect their size and overlap. If it was a little off, I just adjusted a pleat or two here and there to make it fit. It's okay for a few pleats to be 1/8" bigger than the next ones. I promise. 

Sunday, January 9, 2022

A Handsewn Green Striped Robe a l'Anglaise With En Fourreau Back

This project has had quite the journey!!

I started sewing this back in spring of 2017 and posted my initial thoughts and progress HERE. I actually did finish it that summer, but with one thing and another, I never got a chance to wear it and it just sat in a sad little pile in my closet.

Eventually the weather, my schedule, and the stars aligned - I finally got a chance to put it all on and take some photos!

Then I uploaded a few pics to Instagram, etc. and promptly lost my entire hard drive in an epic crash. :(

Well, this post has been sitting as a draft for far too long. One day I will put this dress on again and actually wear it somewhere, but for now, I'm just posting the few pics I have.


You can see my in-progress post here.

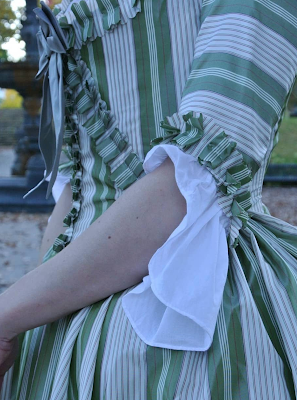
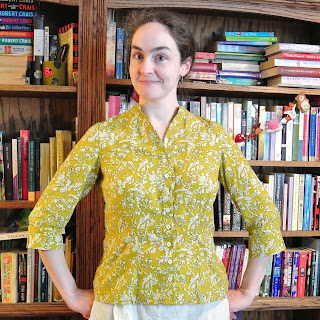
This dress was sewn entirely by hand. The fabric is lightweight silk taffeta and the thread is Metrosene white cotton.

I used the JP Ryan pattern for this dress. The back is cut "en fourreau," that is, in one piece from neck to hem, shaped to the waist with stitched-down pleats.

The back skirt can be poufed up with cord loops that hook onto self-fabric covered buttons. This manner of wearing the skirt is sometimes referred to in the modern era as "polonaise," but it's more accurate to say "retroussé." The polonaise was a completely different style of dress in this era. See Kendra Van Cleave's article on this topic for more.

The trim is scallop-pinked self-fabric, box-pleated along the stripes and stitched in the center. The trim goes around the neckline, sleeve ends, and bodice front. I angled the trim at the bodice side front for a faux-cutaway (or "zone") effect.

I used a scallop-shaped rotary cutting blade to cut the trim. Here's my comparison again of various pinking shapes.


The cuff ruffles are a simple white lawn that I hand-hemmed.

Shoes are Fugawee Annas. On my face I've got some modern mineral foundation powder, plus the liquid rouge and rose balm from Little Bits on Etsy. Big glass pearl earrings in my ears.

My hair is a hot mess in these photos. I had hoped to try a new style or make some extra pieces but I just ended up with the same old hairdo - what I used for my orange dress and pretty much any other time I've done 18th c dressup - and it wasn't behaving really well either. So it's a bit untidy, but in the dim afternoon light it's just a big dark blob anyway! As long as the general shape and volume was right I'm good!

Here's the basics of the hairdo:

I made this foundation of hair rats, wired and stitched together.

Made some false buckles.

Combed my hair forward, placed the rat foundation on top, and pinned it in place.

Combed my hair over the rat and pinned in place.

Braided the back section of my hair, looped it up, and pinned in place.

Pinned my false buckles in. Done!

I am pretty happy with the fit of the dress, however, I recently had some unexpected weight loss due to illness, so the bust area of this dress doesn't fit as well as it did before, and the neckline gaps just a bit. A small drawstring around the neckline and a bit of padding under the bust would probably fix this.

I took these pictures with the help of my kiddo at Irvine Park in downtown St. Paul.

Tuesday, January 4, 2022

My new winter coat!

This coat has been YEARS in the making. It's not that it was difficult, it's just that there's SO MUCH of it. Plus, it's kinda hard to stay motivated on seasonal sewing out-of-season. This wasn't exactly the first project I wanted to reach for in the hot days of summer!

Anyway it's done now and I am so glad! 


It's a very fit-and-flare shape with a nicely defined waist and huge skirt, made in dark teal wool Melton from Treadle. The weather was absolutely dismal today so these photos are very grey, but I did not want to wait a moment longer! 


The hemline is huge. It's practically a full circle. It's swishy and cute and took a TON of fabric.


It also took forever to hem! Worth it, though.


Did I mention the hemline is HA-UGE? So much fullness in back!


I would have loved the look of more buttons, but I know it would have made me crazy to have to do them all up all the time. Besides I only had 4 of this style in my stash.


The pattern is McCall's 6800. I snapped it up as soon as I saw it because a fitted, classic coat pattern is a find. Thar was like 4 years ago and I think it's still current!

I made the bottom of view D and the top of A. I made the break much higher to keep the cold out, and I made the collar and lapels a little narrower, but didn't change much else. I cut the size 12 and made a full bust adjustment, then sewed a mockup and tweaked the fit.

Ok, my lining is boring, but I learned my lesson on my last coat about needing some slip in the sleeves! I interlined the coat with cotton flannel for warmth; you can see through the lining where the flannel stops.

I put plenty of ease into this lining - I learned my lesson on that, too! There's a big pleat at center back and the lining moves loosely in the coat.

I had a terrible time getting that collar to lay flat! The topstitching helped, plus rolling it into shape before stitching. Also I just love these buttons! Dug them out of the stash.


Cute pocket fabric, because why not? It's 18th c repro cotton print. I don't like slippery pockets. The pockets are in-seam on the side front.


This pattern called for a lot of fabric, and I was short by almost a full yard. So I ignored the nap layout.


Then I realized I forgot to cut out the front facings. So I got creative with piecing. Definitely made good use of my cabbage!


The piecing is all in the lower inside front. It's pretty discreet.


I also had to piece a small strip into the lower sleeve. Again, I tried to choose a less-noticeable area.


One more inside detail: I clipped the heck out of my princess seams, especially at the waist. With so much curve I did not want to risk puckering. 

 
There are small shoulder pads sewn in for structure, I think about 3/8" thick. 

I could nitpick many, many things, but overall it's pretty dang good. The fit is not perfect, but oh well. It is definitely the best coat I've ever made! And now I really want to start another one. Maybe green?

Sunday, August 29, 2021

My comfiest masks

I never thought I would be so picky about my masks, but here we are. With the Delta variant it seems like masking is still a helpful measure and I want to do my part, but stay comfy, too! So here are the iterations my pattern has undergone in my comfy quest. 

I started out making masks with a basic pleated rectangle pattern. It worked, but it was not so great.


I soon after tried the seamed-front pattern from Craft Passion - download it for free here!


I liked this shaped style much better! Plus the little channel on the sides to cinch it up, and the strips of knit fabric for head ties vs. twill tape or elastic - all huge improvements.


Here's the Craft Passion pattern, along with my traced versions with added seam and hem allowances. Again, you can download her free pattern here.


Okay, onto some CHANGES!

With all-day wear, I found the masks pushed uncomfortably into my nose, so I added just to the front of the pattern, particularly at the top.


That really helped! The extra room kept the mask from smashing my nose. 


Here's the original next my my updated version. (The tiny handwritten notes say I added a little extra length, but I ended up taking that off as it cut in a bit under my chin. See pattern comparison above.)


But  even though it was roomier, I still found that the center seam annoyed my nose after a few hours. So I drafted this version with a bias-cut center gusset.


Again, very comfy, and no chafing seam! But it's possible this one is a little too loose; I did find if I breathed quickly I inhaled the loose mask fabric a little. More tweaking is needed.


COMFY NOTES:
  • Pre-wash your fabrics! A mask that fits now might shrink and feel tight after washing.
  • Use T-shirt or knit fabric ties. I cut 1" strips and pulled them to make them curl. I prefer head ties but this works for ear loops too. I left extra length to untie and adjust as needed.
  • Line your mask with something smooth; anything linty can really irritate the nose. I used cotton sateen for my last few.
  • Make your side channel small; the tie should fit snugly. That way you can adjust the straps and the mask will stay where you put it.
  • Trim the heck out of your seam allowances. Grade, layer, and nest (press in opposite directions). Anything to reduce bulk.
I hope this helps you stay comfortable and masked! 

Thursday, July 22, 2021

Soulshine and Daydreams Quilt

I made this quilt for a work display and I am so happy with how it turned out!


It started with the Soulshine and Daydreams fabric collection; we got the big central panel and three of the coordinates in at Treadle and I was immediately smitten. I looked for a pattern online - usually fabric companies release a pattern when they have panels like this - and found Beautiful Dreamer on the Benartex website.


I am really glad I found a pattern I liked, because making stuff up from scratch is not my strong point, especially in quilting. Since we didn't have every single fabric in the collection, I added a few others from the store and a few from my stash.

There's a Kaffe Fassett print and an Anna Maria Horner print that are both current at Treadle, and a lot of my stash pieces came from my trip to Gruber's a few years ago.


I did have Quilting Math Problems, probably because of the changes I made. Around the central panel, I modified the dimensions a bit, so I had to take in the side pieced units a tad, and add an extra square to each top & bottom pieced unit. 


I free-motion quilted it myself on a regular machine. Most of it I did in a curlicue pattern, but I wanted to give the face a little more attention. Spirals in the cheeks, a defined nose and brow, and more details and curls in the hair. 


The backing is an organic cotton print from Treadle. It has a blue tone in the leaves that's darker/cooler than anything in the quilt top, so it's not a perfect match, but I really love it and I am trying to tell myself it's close enough.


I do like the scale of the backing with the quilt, and the floral motifs, and the pinks and yellows. I wish the teal green came through a bit more.


I could not decide on a binding fabric so I just pieced all my scraps. 


I don't think I have ever made a quilt this fast! I wanted to get it done to hang up in the store. I can't wait to take it home, though! It's going to live on my living room chair and be all for ME!