Showing posts with label 18th century. Show all posts

Sunday, January 9, 2022

A Handsewn Green Striped Robe a l'Anglaise With En Fourreau Back

This project has had quite the journey!!

I started sewing this back in spring of 2017 and posted my initial thoughts and progress HERE. I actually did finish it that summer, but with one thing and another, I never got a chance to wear it and it just sat in a sad little pile in my closet.

Eventually the weather, my schedule, and the stars aligned - I finally got a chance to put it all on and take some photos!

Then I uploaded a few pics to Instagram, etc. and promptly lost my entire hard drive in an epic crash. :(

Well, this post has been sitting as a draft for far too long. One day I will put this dress on again and actually wear it somewhere, but for now, I'm just posting the few pics I have.




You can see my in-progress post here.

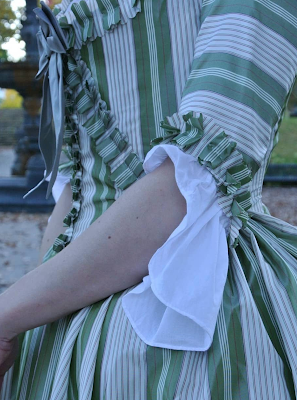
This dress was sewn entirely by hand. The fabric is lightweight silk taffeta and the thread is Metrosene white cotton.

I used the JP Ryan pattern for this dress. The back is cut "en fourreau," that is, in one piece from neck to hem, shaped to the waist with stitched-down pleats.

The back skirt can be poufed up with cord loops that hook onto self-fabric covered buttons. This manner of wearing the skirt is sometimes referred to in the modern era as "polonaise," but it's more accurate to say "retroussé." The polonaise was a completely different style of dress in this era. See Kendra Van Cleave's article on this topic for more.

The trim is scallop-pinked self-fabric, box-pleated along the stripes and stitched in the center. The trim goes around the neckline, sleeve ends, and bodice front. I angled the trim at the bodice side front for a faux-cutaway (or "zone") effect.

I used a scallop-shaped rotary cutting blade to cut the trim. Here's my comparison again of various pinking shapes.


The cuff ruffles are a simple white lawn that I hand-hemmed.

Shoes are Fugawee Annas. On my face I've got some modern mineral foundation powder, plus the liquid rouge and rose balm from Little Bits on Etsy. Big glass pearl earrings in my ears.

My hair is a hot mess in these photos. I had hoped to try a new style or make some extra pieces but I just ended up with the same old hairdo - what I used for my orange dress and pretty much any other time I've done 18th c dressup - and it wasn't behaving really well either. So it's a bit untidy, but in the dim afternoon light it's just a big dark blob anyway! As long as the general shape and volume was right I'm good!

Here's the basics of the hairdo:

I made this foundation of hair rats, wired and stitched together.

Made some false buckles.

Combed my hair forward, placed the rat foundation on top, and pinned it in place.

Combed my hair over the rat and pinned in place.

Braided the back section of my hair, looped it up, and pinned in place.

Pinned my false buckles in. Done!

I am pretty happy with the fit of the dress, however, I recently had some unexpected weight loss due to illness, so the bust area of this dress doesn't fit as well as it did before, and the neckline gaps just a bit. A small drawstring around the neckline and a bit of padding under the bust would probably fix this.

I took these pictures with the help of my kiddo at Irvine Park in downtown St. Paul.

Thursday, June 7, 2018

An 18th Century Gown and Bonnet for an 8-year-old

Last week I sewed this 18th century style gown and bonnet for my 8 year old kid. We had planned a picnic which got canceled due to rain, but dressed up and went out for a little lunch anyway. Here she is! 


The restaurant had the fireplaces lit in the basement.


Working hard at something!


We stopped at a small park on the way home for some more photos.


The Making:

I started with 2.5 yards of 60" wide poly taffeta. I am usually a fiber snob but, a.) this was reaaaaallly nice poly taffeta, I promise, and b.) it's kid clothes. The pattern was drafted from another old pattern, which I enlarged (because she has grown) and also made new/different seams. You can just barely see the curved back seams here.


An inspiration image from Costume In Detail. The girl's dress is plain, open in front. I also loved the bonnet.


Here's the shift, which I made from an old cotton sheet.


Pockets and petticoat. I got this embroidered fabric for free. The petticoat is just some very cheap muslin I had laying around.


The petticoat is your typical drop-front construction. No bum pads or stays, just these.


 I machine-sewed everything I could. The whole petticoat, almost all of the shift. I hand-hemmed the shift neckline just because it was easier on the curves. The lower lining seam of the dress is sewn down by hand. There is no closure because I just used pins.


I trimmed the dress with pinked, self-fabric pleats and some fine dotted netting. All applied by machine. (See above: kid clothes.) I made the pleated strips on the machine with the fork method.


I shaped the net at the elbows to be longer in the back. I had to apply the sleeve trim by hand because it was too tiny to get into the machine.


The Bonnet:

I liked the one in the image above, as well as those little silk market bonnets that everyone is making these days. See A Fashionable Frolick, or American Duchess blog. I made this one out of some grey silk taffeta from the stash.

I've been trying to make one of these for myself for ages, but making up my own brim shape was challenging. It always looked dorky, no matter what. Here's what I ended up with for The Girl. Please feel free to copy this if it helps you at all!


Like the dress and undies, I machine-sewed as much of this as possible. First I cut the brim shape out of Peltex (not buckram! I'm such a cheater!) and sewed millinery wire to the edge using a machine zigzag. Then I cut two silk pieces for the brim (adding seam allowance) and sewed the front seam. I clipped the seam allowances and inserted the wired Peltex piece. The I folded the back seam allowances over and machine-stitched them down. Brim done.

For the crown portion, I made a drawstring casing along the straight back edge and put in some cord, stitching it down at the sides and bringing the ends through a small space I left open at the center, making a drawstring to adjust the size.

I zigzagged the raw edge, then moved to hand sewing. I whip-gathered the curved edge of the crown and hand stitched it to the brim.


It looks a little messy from the inside, but it doesn't show when worn.


I pinked a few strips of the silk and made a big bow attached to the center front. I did her hair in a soft bun at the back and frizzed up her natural curls in front a bit. 

The brim shape isn't entirely how I anticipated, and maybe the crown is too wide on the sides, but I love it anyway.


I am so in love with how this whole outfit turned out! She had requested a fancy dress with ruffles and I think this did the job. 

Friday, May 19, 2017

A New Project

I haven't had a new historic project since I finished my plain and simple dress without a lot of frippery in January. This project wasn't on my To Do list, but I've had the fabric for ages and it's been rattling around in my head for awhile.

First some inspiration. I am not trying to copy any specific dress. My fabric is my starting point.

This one from the Kyoto book is probably my main inspiration. I love the stripes and the trim, which looks like box pleats plus something extra. And I love the fact that it's all self-fabric. The only thing I don't like is that it's cut with no waist seam (polonaise) which is pretty but I have no idea how to make it fit. So I will actually be making an anglaise.

Yellow striped silk taffeta Robe à la polonaise, c.1780's Hooked closure at front; buttons to tack robe; matching petticoat. Following the trend toward simple clothing, women's costumes in the 1780s became more casual & fabrics used to make dresses had a light texture. ©The Kyoto Costume Institute, (KCI) photo by Takashi Hatakeyama:

A great skirt shape here.

c1776 French Fashion Plate - Back View:

This one has the en fourreau back I plan to do.

Wool Damask Robe a l’Anglaise, 1785 Diadema Morgan wore this gown at her wedding to Phineas Field of Northfield in 1785.:

I knew I wanted the skirt silhouette to be HUGE. I tried on all my false rumps and pads but nothing was big enough. So I made a new one! Here it is in progress. I promise I sewed the waistband down properly later.


Here's what I've actually sewn so far. It's slow going because I am doing it 100% by hand. The skirt is together but not hemmed. The fabric is striped silk taffeta.


It's huge on the sides!


It's huge in the back!


It's huge all around!


The trim will be pinked self-fabric. I have obtained a new rotary blade for this that cuts scallops, which is a slightly more interesting look than plain zigzag pinking. Plus, scallops are period!


Of course I had to do a comparison. From top to bottom, new scallop blade, old pinking blade, normal pinking shear.


When I started this dress a few weeks ago, I thought I would whip it out real quick and wear it to our 18th century picnic event this weekend. HAHAHAHAHAHAHA. I now plan to finish it for Costume College this summer. 

Tuesday, July 14, 2015

Orange silk taffeta robe a l'anglaise

I made this dress for the June 2015 18th Century Picnic with the Historic Recreation Society. I used the J.P. Ryan Robe a l'Anglaise pattern. This and the two petticoats are entirely hand-sewn.


The front closes with pins. The back poofs are created by tying two twill tape ties together on each side, a method I saw on an extant dress in the book Costume Close-Up. One is at the side back waist and the mate is about 12" up and 24" in from the front opening. I tied them with about 6" distance. I liked this method because I didn't have to worry about having a pretty cord that matched, and also I can wear it in the future as a plain open gown if I like.

I am wearing it over a shift, my green cotton twill stays, my new divided bum pad, a linen petticoat, and a sheer cotton petticoat with a woven stripe. On my feet are a pair of Fugawee Annas and some white clocked stockings from Jas. Townsend. I also have two pockets tied on and a cotton lawn neckerchief. My hat is a plain straw that I re-trimmed with orange flowers, a white feather, and a strip of green silk faille pinked and used like a ribbon. I wore glass pearls in my ears.

Construction photos:

I did not use the directions in the J.P Ryan pattern. Instead the seams were lapped and sewn from the right side with a spaced backstitch, as described in Costume Close-Up.


For the trim, I cut 1.5" strips with my rotary pinking blade and used graph paper as a pleat guide. I made 1/2" box pleats spaced 1/4" apart.


The bum pad, the design of which I owe to A Fractured Fairytale. After I made it I ripped and re-sewed the pads to move them a little closer together.


A linen petticoat I handsewed with linen thread.


The striped cotton petticoat I handsewed with cotton thread.


A detail of the cotton petticoat's pocket slit. I hemmed the edges of the slit and added a thread bar to reinforce the bottom point. The point and the bar have buttonhole stitch worked over them.