Wednesday, September 20, 2017

How To Make a Star Trek Communicator Badge

For my daughter's Deanna Troi costume from Star Trek: The Next Generation, I made this communicator badge.


I had thought about buying a nice fancy com badge, but I was feeling thrifty so I decided to pull this together from scraps I had on hand. I like the way it turned out a lot! It's 3-dimensional, which makes it much more realistic than embroidered or appliqued ones, and since it was so cheap and easy to make it's perfect for kids and/or more casual costuming.

What you'll need to make this:
  • 3" x 6" piece of fusible Peltex interfacing
  • 4" x 4" piece of Wonder-Under fusible web
  • 4" x 4" piece of yellow cotton fabric
  • 4" x 4" piece of silver lame fabric
  • 2" x 3" piece of felt
  • Metallic gold fabric paint
  • Pin back
  • Hot glue gun or fabric glue
  • Thread and needle
  • Basic sewing supplies
  • Printout of your com badge

For the silver part, I used a metallic lame fabric, and for the gold, I used metallic paint on plain cotton. You could definitely use metallic paints for both fabrics, or try to find metallic fabrics for both parts instead of doing any painting. This is just what I had on hand.

There are tons of different com badge styles for the various series. A Google search brought up loads of charts and images. The one I chose is from an eBay product listing of a repro com badge for sale.

What To Do:

Trace your com badge components and cut out of the fusible Peltex. Make sure you cut this with the fusible side facing UP. I did this wrong the first time and ended up with a mirror image shape. 

Also, don't be afraid to spend time making tiny adjustments to the shape. Details matter, and you want the right shape and perfectly smooth edges here, because you can't fix it later.


Fuse the Peltex shape to your silver lame: put the Peltex piece on the ironing board, fusible side facing up. Lay the lame over the top. Cover it with a pressing cloth. With your iron set to a medium heat and steam, press firmly for about 10 seconds. Don't move it until it is cool.

Trim the excess lame around the shape to about 3/8". (Please note this photo is of the one I traced backward. Oops!)


Fold to the wrong side and sew in place, using long stitches to connect the opposite sides like a ladder. Fiddle with the corners to make them nice and pointy and then stitch them firmly.


It's probably possible to use glue for this step, but I don't recommend it. Glue is messy, slow, and much more difficult to make smooth. I know this because I tried it on my first (backward) attempt! Sewing it is quick and simple and you don't have to care much what the stitches look like because they will be covered up later!

When you're done it should look like this.


Set aside and move onto the gold part! 

Apply the Wonder-Under to your yellow cotton fabric. Leave the paper backing on. 

If you've never used Wonder-Under before, its job is to make any fabric into an iron-on fabric. First you fuse the Wonder-Under to the fabric, then you fuse the fabric to whatever you want! I happened to have a yellow scrap with Wonder-Under already fused on to it, or I might not have bothered, since the Peltex is already fusible, but it did make some of the next steps easier.

On the other side, paint a few coats of gold metallic paint. Wait for it to dry. (If you're using gold fabric, skip this step.)


Peel off paper backing. Place your Peltex shape on the ironing board, fusible side up, and put your painted fabric on top, fusible side down. (Fusible sides of each should be touching.) Cover with a press cloth. 

Press lightly, just in the center, using the tip of the iron only. You don't want to fuse the whole piece of fabric to your ironing board! Just the middle of the oval shape.

Trim the edges and notch the fabric. This makes them turn in more smoothly. Be careful not to notch too close to the Peltex or you'll have a cut in your finished edge.


Fold all the edges over and press to fuse them down. I did this by placing my press cloth on the ironing board, then putting my oval piece on it and gathering the cloth up around the oval shape. The press cloth pulls the edges in and keeps them neat while you iron over the whole thing.


All done!


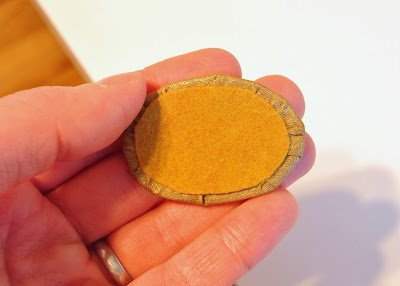
Warm up your hot glue gun, or get out some fabric glue. Cut an oval of coordinating-color felt a little bit smaller than your gold oval. Glue in place.


Glue your two pieces together.


Find a pin back. I got this one at a craft store but I actually ended up ripping it off later and using a safety pin instead, because this pin back had a very thick pin! I could not pin it to the costume without damaging the fabric. So check your pin first.


Glue in place. You can see that I am super messy at hot glue. But that's okay, because it's the back, and no one's gonna see it!


The finished communicator.


It was a perfect accessory for her costume!


Tuesday, September 19, 2017

Star Trek Costumes!

Here we are as Deanna Troi and Lwaxana Troi from Star Trek: The Next Generation!


Several of these photos were taken by the awesome official CONvergence photographer, Catherine Of The Sea. Her con albums are here and here

I'll go over my Lwaxana costume first since it was more complicated. I didn't want to put a huge budget into this so I didn't bother trying to copy any of her dresses exactly or make it screen accurate at all. Just something feasibly Lwaxana-ish! 

I was inspired by the bodice with neckline cutout on this one:


 And the column shape with silver contrast seen here:


If you haven't already checked out the hilarious and wonderful Fashion It So, do it now! I found a lot of research images there.

So I started with this cheesy prom dress from Goodwill.


It had a weird back lacing detail that I undid.


I had some silver metallic knit that I threw over the dressform and played with.


I did not notice until after it was done that I made my cutout mirror image from the show! Ah, well.


I wore the thrifted dress unaltered. I used a basic fitted T-shirt pattern for the silver top. At first I went WAY overboard on the cutout! So I had to re-cut the front. I edged the cutout with metallic trim and held the small front point in place with a brooch.


The hair was a project of its own! Lwaxana has a lot of different hair looks, but they all involve unruly curls. I started with this wavy hair extension on a clip. Again, this project was on the cheap, so while a full wig might have been better, I already had this in a drawer.

I removed the clip and the elastic, and rolled it in rollers. 


I dipped it in boiling water for about 3-4 seconds, then let it cool. I pinned it on a styro head to dry.


When it dried I let the rollers out.


And spent a long time messing up the curls.


To wear it I pinned up all my hair in the loosest, softest braid bun I could. 


Plopped the curls on top!


And pinned as needed to keep in place!


I added gold eyeshadow, as much lipstick and blush as I could make stick, and some glitzy earrings. Done!


I could have gone WAY more intense on the rhinestones and glam, but I think this conveyed the general impression. 

I was honestly a bit afraid to go to the con wearing this, because of its total non-screen-accuracy and absolute crappiness. But I had SO MUCH FUN wearing this costume. I loved playing in character as Lwaxana. I spoke in character to every Star Trek TNG person I saw. Only a few really got it and played along. And only ONE person came up to me and said they recognized my costume. And they even said "Nobody ever cosplays Lwaxana!" But having even one person know who I was supposed to be made it worthwhile.

Okay, onto little Deanna!


Of all Deanna's looks, my daughter liked this one best.


In this photo it looks much more grey. Or is this a different costume in the same design?


Either way, I talked her into grey because we just couldn't find anything in that icky mauve.

To make the pattern, I traced a pair of leggings that fit her, then traced a fitted T-shirt pattern, adding CF and CB seams and cutting it off at the leggings' waist. I shaped the neckline into a deep V and measured it for the contrast band. Then I just taped my traced patterns together!


There's no closure; to get it on she just stepped in through the neck. This was a little awkward, but the neckline is big enough (and stretchy enough!) that it worked.

I made a headband from the same purple contrast as the neckband, with some of the silver metallic trim I used on my Lwaxana outfit. The back has a bit of elastic and I used the hook side of a piece of Velcro on the underside to make it stick to her hair. A high pony with her natural waves was the hairdo.

The communicator badge was a project in itself. You can read more about it here (with tutorial!).

I had a ton of fun with my little one!


Friday, September 15, 2017

CONvergence 2017

This summer, The Girl and I attended our local sci-fi and fantasy convention, CONvergence. The con is a long-weekend event, but we only went for two (short) days. That ended up being just the right amount for her first con (and my first with a little one!).


I'd been to this con a long time ago (I wanna say 2004?) but I didn't really see the point of it. I wasn't into serious gaming or fandoms and whole thing seemed a little too serious and just not my cup of tea. Also I guess that was before cosplay really exploded, and while there were a few people dressed up, mostly people were saving their costumes for the Masquerade. This time it was absolutely a costume convention!

The other thing that seems to have changed at cons is a welcoming and accommodating atmosphere. Overall, I was really impressed by the con's commitment to inclusivity for all people. There was also a great amount of kid-friendly stuff!

On Friday, we wore our Star Trek costumes. The Girl was Counselor Deanna Troi, and I was (of course) Troi's mother, Lwaxana.

Obligatory goofy selfie. Read more about these costumes here and here!


An awesome TNG control panel!


She is reading Connie's mind. Because Betazoid telepathy.


Somebody had a cool transporter!


There was a kid activity where they just destroyed a giant cardboard spaceship. Hilarious commentary was provided. It was WAY more chaotic than this photo makes it look.


I ran into some of my Treadle sewing students! Both dressed as Belle! But different!


Marty also made this awesome Dr. Strange costume!


And we met another Deanna! I totally just went up to her and started being Lwaxana at her. I think I caught her off guard but she totally played along. Super fun!


We played giant chess!


Among the many cool costumes we saw: gender-swapped Sally and Jack.


Velma!


Many handmaids.


Crap-tons of Star Wars. This cute toddler was a standout.


Waldo!


Ghostbusters.


Dwight Schrute. I almost walked past this guy. (Confession: I briefly mistook a hotel employee for a cosplayer earlier that day. He had a suit and a briefcase and just looked so... intentional! So I didn't want to screw up again.) I just cautiously asked, "Dwight?" and he was like yeah (and then I noticed he had a bobblehead doll of himself) so I snapped his pic. I LOVE this cosplay, it's hilarious.


A very dapper Beetlejuice.


Okay, friends, help me out with this box. At first I assumed it was The Luggage (from Discworld) but now I am not sure. Anyone recognize it? It was pretty cool.


On Saturday we went back for more fun. We dressed as My Little Ponies. The Girl was Pinkie Pie and I was Twilight Sparkle. (More costume details later!) We stopped for balloons for a cute and practical (so I could see her in the crowds!) accessory. 


One really cool thing we found in the hall was this giant coloring page. It was set up on a stand with buckets of colored pencils (with a sharpener bolted on!) and people just wandered by and colored. We stayed there for a long time.


There were many interesting/funny cards at the card/flyer table.


Some of the cool costumes we saw Saturday. Lego Batman!


This hilarious Galaxy Quest group. They were so completely committed to being in character. It was awesome.


The Girl's balloons started drifting over to them and they had a great time poking at them and being generally confused by them.


Ok, so I figured these guys were from one of the Rocky movies but I totally had to google it. Apollo Creed and Ivan Drago.


And, finally, we found Jesus. This guy cracked me up. Also I called him "cheeses."


We did not get to do everything we wanted (we had to miss the Masquerade to go to a friend's wedding!) but we did a lot of fun activities. We checked out the art show, did some kid crafts, I went to a couple panels that were super fun, and we watched a couple movies in the cinema.

There were plenty of people just randomly sitting around playing cards and doing puzzles, but we found that the organized gaming was Not For Us. The 22nd floor was the gaming floor, and it was mostly devoted to intense computer gaming.

It was super fun being in costume, and seeing lots of other folks dressed up. I definitely want to go again next year. I think we'd have more fun if we planned a more definite agenda and made sure to be at panels and activities on time. Plus I could have used some knitting, more books for The Girl, and a Fluxx deck. 

Other things to do next time: Check out the evening stuff. Especially the masquerade! I know Con can get a bit rowdy at night, but I am hoping some of the room parties are still PG in the early evening.

Also, we never made it to the second venue across the road. That's where they had the dealer's room, the entertainment stage, and some other fun things.