Saturday, March 12, 2016

A fitted blouse in Japanese double gauze

I made this blouse for a display for Treadle. The fabric is an utterly dreamy Japanese cotton double gauze. It is so soft and pretty. It was also very easy to work with. Its open weave helped it ease beautifully. Here it is worn with a cardigan I re-styled from a thrift store pullover and a linen skirt I made last fall.


I love that little bit that peeks out below the sweater in back!


Here you can see the whole blouse without the cardigan, although I really made it for layering and I doubt I will ever wear it on its own. The fit skims over the body smoothly, neither baggy nor tight. To make that happen I modified the front with a Full Bust Adjustment (FBA) and took in the waist in back to nip in toward my slight swayback. I cut one size smaller than my high bust measurement before I did the FBA to prevent the upper chest becoming baggy. I also re-positioned the front princess seam slightly to bring it closer to my bust point. 


Another trick I used (useful for the narrow-backed, full-busted) was to cut the back pieces a smaller size so that more of the 'body room' ends up skewed toward the front, where I needed it. I got this technique from Truly Victorian's sizing method. It translates to modern sewing!


I sewed it mainly on the machine, finished the seams with the serger, and finished the inside front bands, cuffs, and neckband by hand.

The pattern is McCall's 6124, a classic princess-seamed shirt. I chose the princess seaming to get a smooth fit without the bulk of huge darts.


 Here's a detail shot on the dress form where you can really see the beautiful soft floral print of the double gauze.


I am very happy with this and plan to make more! I would love to replace some of the long-sleeved t-shirts I currently use for layering with soft blouses like this. When I make this again, I will want to add just a smidge of length to the sleeve, and possibly shorten the body slightly. And possibly modify the neckline to be a lower scoop or a V.

Thursday, February 11, 2016

Historical Food Fortnightly #3: Plain Muffins

I started out quite stumped on this challenge. The theme was "History Detective," or trying to interpret a vague or confusing historical recipe, but while I have of course read plenty of weird, vague recipes, when the time came for this challenge, everything seemed to (infuriatingly!) make sense. Maybe I have been reading historic cookbooks for too long, and the strange terms for foods and the archaic measurements are now more familiar to me.

I could have just picked a recipe at random and claimed it was vague to me, but that would be cheating! So instead I spent many fruitless hours poring over cookbooks and having dead-end brainstorms, until I finally ran out of time.

I finally just decided I would make some kind of quick bread, and found a pretty vague recipe in the Open Door Cookbook. I went to check the book's publication date and found - AHA! - there was none to be found. Here was my historical food mystery! Not my recipe but the date of my cookbook. I made my muffins and used clues from the book to guess its date.


The Challenge: 3. History Detective (January 29 - February 11) For this challenge, you get to be the detective! Either use clues from multiple recipes to make a composite recipe, or choose a very vague recipe and investigate how it was made.

The Recipe: Plain Muffins, submitted by Mrs. C. R. Parker to the Open Door Cookbook, published by the Open Door Congregational Church. I got this book and a few others at a local garage sale last summer.


The Date/Year and Region: Minneapolis, Minnesota, USA. For the date, let's look at some clues from the book.

First we have this Lux advertisement. The hair on this gal looks absolutely like early 19-teens; up-swept, over the ears, but without the full front pompadour of the early 1900s. See an example here. Plus her shirtwaist blouse is very 1905.


Another illustration with a late 19-teens look. The little puffs of hair over the ears are a dead giveaway! See a similar example from 1917 here.


A doughnut recipe in the book calls for Crisco, which was introduced in 1911.


Then there is this great color ad. Without this I would have just said 1918 and left it. The woman's collar has a late 19-teens look, but the shape of her apron is very flat and boxy, with no waist, suggesting a 1920's style.


Also, this is a flour ad, not a high fashion print, so the clothing represented would have to be considered mainstream, not too new or avant-garde. The clothing couldn't be too out-of-date though, or it would look dowdy and old fashioned. As we all know, that's not how you sell flour!

These clues all place this book's date definitely after 1915, and as late as 1925.

How Did You Make It: Only ingredients were given in this recipe, no method or cooking time, so I just mixed the dough like I normally would for muffins. First I beat the eggs in a bowl, then added the melted butter, then stirred in my dry ingredients and milk. I did sub in half a cup of whole wheat flour because I can't leave well enough alone. Given the amount of recipes in this book for "graham" and bran biscuits and muffins, I don't think this is an unreasonably inaccurate change.


The large amount of baking powder in this recipe - 4 teaspoons to 2 cups of flour - made the batter thicken up immediately with a foamy texture. No baking directions were given, so I checked a couple other muffin recipes. All they suggested was "a quick, hot oven," no time given. I gave these about 17 minutes at 400 F.


That thick foamy texture made a bumpy, irregular finished muffin, with little toasty edges everywhere. Yum!


There is no such thing as too much butter.


Time to Complete: 15 minutes of prep, 17 minutes in the oven.

Total Cost: Pretty cheap, just pantry stuff. A couple dollars?

How Successful Was It?: Yummy. The crumb was soft and springy, the exterior slightly crisp like a biscuit. Slathered with butter they were the perfect companion to a cheese and spinach omelet.

How Accurate Is It?: I subbed in some whole wheat flour, and I greased my pan with an organic palm oil shortening, whereas Crisco (hydrogenated cottonseed oil) or lard would have been the more likely choice at the time. Otherwise I followed as written.

Thursday, January 28, 2016

Historical Food Fortnightly #2: Cherry Trifle

I consider myself an adequate cook. I can make good wholesome meals with ease, my bread is light, and my desserts are toothsome. But one area I am sorely lacking is Making Food Pretty. Or presentation as they say these days.

So while I enjoyed eating this challenge, I am the first to admit that the looks are... pretty sloppy. Judge for yourself.


The Challenge: 2. Culinary Vices (January 15 - January 28) Some foods are really, really naughty. Globs of butter, lashings of sugar and syrup, decadent chocolate and wine. Bring out your naughty, indecorous side with foods associated with all the bad things, in the best ways.

I am no stranger to trifle; I have been in love with them ever since Nigella Lawson's How To Be A Domestic Goddess came out. And the concept is pretty simple: take some old cake, soak it in booze, top with jam or fruit, and add custard and whipped cream.

What could be more vice-ridden than combining cream, sugar, and alcohol?

The Recipe: I used three separate recipes, one for the trifle itself, one for the custard, and one for the cake. The first two are from Mrs. Beeton's and the cake is from National Cookery.


The Date/Year and Region: mid-late 19th century, England/America

How Did You Make It: I admit I played fast and loose with the trifle recipe. For one thing, I didn't have any macaroons or ratafias (whatever they are) and for another I didn't particularly like the idea of mixing raw egg whites into my whipped cream. Plus I hate sweet sherry, so instead I used a fruit-flavored liqueur.

For the other two I followed as written, but for the custard I used 5 whole eggs plus 4 yolks, and half milk/half cream.

Baked my cream sponge cake.


Made my custard in the double boiler. Usually I just make it in a pot and the double boiler took FOREVER.


I wish I had had more time to let my cake stale. Alas.


Lined two bowls with cake. I made a separate, non-alcoholic version for my young daughter.


Cherry booze and cherry jam!


Cakes soaked and sprinkled with lemon zest.


Jammed it and sprinkled almonds.


And finally, whipped cream and more almonds.


Oh, trifle, you are not pretty, but I wanna eat you anyway!


Time to Complete: Two days overall, about 2 hours actual work time.

Total Cost: Two pint of cream at $4-ish, a jar of jam, eggs, sugar, flour, liqueur. . . maybe $20.

How Successful Was It?: It looked. . . homely. It tasted amazing. The alcohol-soaked cake was soft and strong, the custard creamy and sweet, the jam full of big fruity chunks.

 How Accurate Is It?: I improvised a lot. Cherry liqueur instead of sherry, cherry jam in place of strawberry, and normal whipped cream (made with the electric mixer!) in place of that with eggwhites added. I also omitted the macaroons and ratafias. However, all the ingredients were available at the time, and I don't think anything I did sticks out like a sore thumb.

Monday, January 25, 2016

A Victorian-ish Coat for Ice Skating

Our local group had a Victorian Ice Skating event last weekend, and while my daughter had a perfectly good dress from last year that still fit, I wanted to make sure she kept warm in period fashion. Which means she needed a coat.

I used a heavily modified modern sewing pattern for this. I suppose I could have drafted something from scratch based on period diagrams, but I went the shortcut route, mostly because drafting collars is a pain. I eliminated the pattern's waist seam, added a lot of width and flare to the coat's lower section, and fiddled with the sleeves a bit. The collar is pretty much the only thing left un-altered from the original pattern. 

I call it "Victorian-ish" because it's not strictly period, but it has a historic enough look. I wanted something that wasn't too costumey and would work as her modern good coat for a couple years. Coats haven't changed much and Victorian ones aren't that different from dressy modern ones anyway.


We had a lovely time skating!


The fabric is brown wool Harris tweed (yup, the real Harris tweed from Scotland, yum) that I bought at Treadle. She chose this from a group of swatches I brought home. I underlined the bodice portion only with cotton flannel for extra warmth, and lined the coat with a remnant of cream-color silk shantung I found in the stash. I sewed it all on the machine, except the hem. I used horsehair canvas in the collar and linen to interface the front facing.


The fabric was dreamy to sew with; soft and very lightweight. The finished coat was very light, but she reported that it felt very warm. The wool was also super easy to ease at the sleeve cap. 

Every coat I make is a learning experience, this one included! There are always a few little things I have to learn over again. The lining could definitely have used more ease in the length; it is perilously close to hanging up the coat fabric in a couple places. And the collar does this flippy thing on one side I haven't figured out. But overall, I was very pleased with it. So was she!

To go with her coat, I made a super quick faux fur muff. I just ran a length of ribbon through it to wear around the neck.

She also had a hood from last year, made of white wool with an attached scarf and tassels.

Sunday, January 3, 2016

Historical Food Fortnightly #1: Potatoes and Cabbage With Cheese Sauce

The Challenge: 1. Meat-and-Potatoes (January 1 - January 14) They’re a staple for the tables in the most rustic cottages as well as the fanciest banquet tables - and it’s also an idiom meaning a staple or the most basic parts of something. Make a historic “meat-and-potatoes” recipe - however you interpret it. 

My household is mainly vegetarian, so I had to kind of work around this challenge. Taking “meat-and-potatoes” as an idiom steered me toward basic, wholesome foods, and of course I took the "and potatoes" part literally. I couldn't resist this great little book from 1941, 250 Ways of Serving Potatoes.

 The Recipe: Potatoes and Cabbage With Cheese Sauce


3 cups diced potatoes 
1 quart chopped cabbage 
1 pint boiling water 
2 teaspoons salt
1 cup evaporated milk
1 cup grated cheese

The Date/Year and Region: 1941, USA 

How Did You Make It: Following the recipe's directions, the potatoes and cabbage were boiled in shallow salted water.


The cheese sauce was made in a separate pan. First the evaporated milk was scalded. I don't use evaporated milk much and it looked awful brown to me!


Grated cheddar to add.


Done! Still looks kinda weird and brown.


The vegetables were arranged in a dish and the cheese sauce poured over.


The sauce was thin and they nearly drowned!


Yum!


 Time to Complete: About 30 minutes.

 Total Cost: About $7.

 How Successful Was It?: This was delicious, as I would expect potatoes in cheese to naturally be. The sauce was a little thin, but very cheesy and the dish had a nice amount of salt. I was skeptical about the evaporated milk but the overwhelming flavor was the cheese.

Overall, it was a basic, hearty dish. Very "meat-and-potatoes!"

 How Accurate Is It?: I am not sure what kind of cheese would have been used; the recipe doesn't specify. But otherwise I followed as closely as possible. A mid-20th century recipe is pretty easy to duplicate with 21st century techniques.

Thursday, December 31, 2015

Historical Food Fortnightly 2016

I am going to be participating in the 2016 Historical Food Fortnightly!


I did half the year in 2014, and really enjoyed the experience. I am looking forward to this year's challenges, and lots of combined historical cooking and costume posts!

Thursday, November 19, 2015

How to be Happy in Costume in Winter

With winter right around the corner here in Minnesota, I've put together my tips for being happy in the cold while dressed up in costume.

I originally thought to title this post "How to Survive the Cold in Costume," but I realized that we don't just want to get outside in the cold, snowy weather and survive, we want to be comfortable enough to have fun! We're not talking simply walking from your car to an event, but events where you'll be outside for a long period of time.

Most of the tips below were written with Victorian-era costuming in mind, but can definitely apply to other eras.

1.) Wear layers. If you are dressed in historic costume, you are probably already doing this, right? But you can add layers to your already-existing ones: narrow under-petticoats for warmth, long-sleeved corset covers or combinations, coats, capes, and hoods. Air trapped between layers of clothing insulate your body from cold and wind and keep you warmer. More layers = more air.

Layers also allow you to make adjustments throughout the day as your body temperature or activity level change. You might take off your shawl or hood while ice skating, but when you stop moving you're going to cool down again. Layers = flexibility.


2.) Wool is your new best friend. Truly, wool can do anything. Smooth, fine wools make stylish dresses. Thick, soft wools are perfect for outerwear. Felted wools like Melton can be almost wind-proof. It's historically accurate for almost all periods. And nothing is going to provide breathable insulation like wool.

Wool will continue to insulate even when it gets damp, and wet wool dries faster and feels much less heavy than wet cotton or other plant-based fibers. It breathes well, and wicks away sweat and moisture. Plus it's beautiful and so dreamy to sew on.

If you find wool itchy, you have a couple of options. First, did you know that wool feels more itchy at warmer temperatures? That prickly, unbearable wool you rejected in summer might feel perfectly acceptable in December. Try it when you actually feel cold and it might feel different to you.

Second, you can look for cashmere. Yes, it's much pricier. But it insulates wonderfully and is very, very, soft.

Finally, you can use wool for outer garments only. By keeping a barrier of cotton or silk between your skin and the wool, you can reap all the insulating benefits and avoid the scratchiness.

A lot of folks mistakenly believe they are allergic to wool, when in fact, they have just never experienced good-quality wool that doesn't scratch. Keep an open mind. However, if you truly do have a wool allergy, a polyester or acrylic suiting is still better than cotton for keeping you warm.

3.) Wool socks are non-negotiable. I know, I already covered wool. But socks deserve their own comment. Even if you keep your trunk warm, cold temperatures can be dangerous for feet. My favorite wool socks are made by Smartwool. They are warm, breathable, machine washable, and made of super fine non-itchy Merino, blended with nylon for strength and elastic for stay-uppiness. The solid knee-high or over-the-knee socks are usually best for costumers.

Liner socks give you extra insulation without the bulk of wearing two pairs of socks.

Make sure you buy your shoes, boots, or ice skates large enough to wear thick socks and liners. You may want to go up a half size, or try a wider width. You want a little bit of air inside your boot to help insulate.

As above, if you are truly allergic to wool, acrylic is your next best bet.

4.) Cover your extremities. Mittens are less stylish than gloves, but warmer. If you wear gloves, leather or faux leather are going to block more wind than cloth or knitted ones. And don't forget about muffs!

Winter hat, coat, and muff 1886

If you're a knitter, check out the historic knitting group on Ravelry for ideas and sources for knitted accessories. Felting, double knitting, and Fair Isle (stranded colorwork) techniques can all make knitted accessories warmer and more windproof.

5.) Headwear. There are plenty of fancy winter hats depicted in fashion plates, but if you are outside for any considerable period of time, you will be much, much happier with your ears covered. Hoods, close bonnets, and fine woolen shawls or veils are quite practical.

Fur-trimmed winter hood 1870
Lady on the right has a hood or shawl softly wrapped around her head. Lady on the left is jealous.

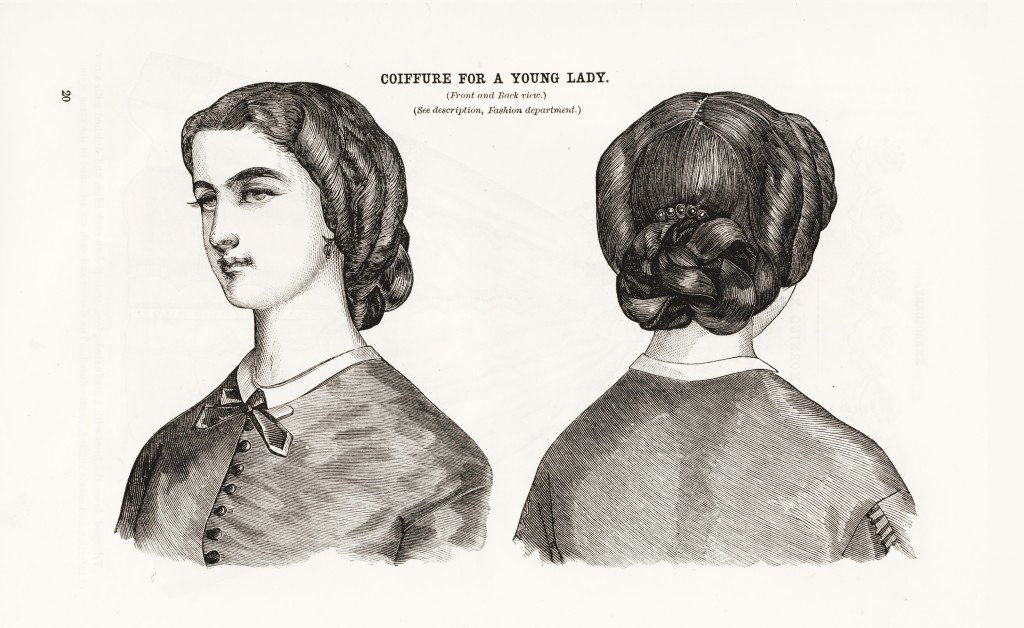
You can also comb your hair over your ears as this provides a surprising amount of insulation. Hair worn this way is seen between about 1845-1870.
Hair dressed over the ears 1860

6.) Protect your skin. Cold air holds less moisture, and cold, dry air sucks the moisture out your skin. Cold, hard winds can give you a windburn. Cover as much exposed skin as possible, and use lotion on any skin left exposed. Creamy, fatty lotions are the best. If you shudder at the thought of putting a thick lotion on your face, just know that dry skin can soak it up like a sponge. It probably won't feel as greasy in cold, dry weather as it may have in warm weather. Ditto lip balm. Crusty lips are no fun.

7.) Eat a lot. I like this one. Just standing around outside, keeping your body warm burns up calories, so make sure you are well fed! Warm drinks are also a plus.

8.) Bring handkerchiefs. Cold air makes for drippy noses. Not fun, but it's true. Plain cotton hankies are functional and pretty ones with lace and embroidery make a great accessory!

Lady with handkerchief
Embroidery pattern for pocket handkerchief, Godey's 1861

Hankies for everyone!!

9.) Stay active. Nothing is colder than sitting still. Get up, take a walk, run around. Skate, sled, jump up and down!


Skiing with composure

10.) Take breaks. It's not a marathon. Go inside and warm up every now and then.

11.) Enjoy it! Instead of thinking about the cold, focus on the fun you're having: skating, walking through a snowy wood, or just being dressed up with friends!

12.) If all else fails, cheat. Above all, you want to be happy and safe. If that means you wear modern long underwear, then do it! Modern boots are much warmer than historic repros, which are typically made of leather with no insulation at all. If you do wear repro shoes, then absolutely use beeswax or a silicone waterproofing spray on them.

Do you have any other tips for cold weather happiness? Let me know!